[et_pb_section bb_built=”1″ admin_label=”section” fullwidth=”on” specialty=”off” inner_shadow=”off” parallax=”off” transparent_background=”off” background_color=”#ffffff” allow_player_pause=”off” parallax_method=”off” padding_mobile=”off” make_fullwidth=”off” use_custom_width=”off” width_unit=”on” make_equal=”off” use_custom_gutter=”off” module_class=”anthemSlider” custom_padding_tablet=”50px|0|50px|0″ custom_padding_last_edited=”on|desktop” next_background_color=”#191919″][et_pb_fullwidth_header title=”Workouts” background_layout=”dark” text_orientation=”left” header_fullscreen=”off” header_scroll_down=”off” background_overlay_color=”rgba(104,110,114,0.25)” parallax=”off” parallax_method=”on” content_orientation=”center” image_orientation=”center” custom_button_one=”off” button_one_use_icon=”default” button_one_icon_placement=”right” button_one_on_hover=”on” button_one_letter_spacing_hover=”0″ custom_button_two=”off” button_two_use_icon=”default” button_two_icon_placement=”right” button_two_on_hover=”on” button_two_letter_spacing_hover=”0″ title_font_size=”60px” custom_css_main_element=”padding: 175px 0 140px;” subhead_font_size=”23px” module_class=”et-waypoint fadein-animated” background_url=”https://eliteform.com/wp-content/uploads/2016/12/0002_velocityFeature.jpg” title_font_size_tablet=”48px” title_font_size_phone=”36px” title_font_size_last_edited=”on|phone” subhead=”ELITEFORM STRENGTHPLANNER” background_image=”https://eliteform.com/wp-content/uploads/2016/12/0002_velocityFeature.jpg” content_max_width=”100%” background_color=”rgba(255, 255, 255, 0)” button_one_text_size__hover_enabled=”off” button_one_text_size__hover=”null” button_two_text_size__hover_enabled=”off” button_two_text_size__hover=”null” button_one_text_color__hover_enabled=”off” button_one_text_color__hover=”null” button_two_text_color__hover_enabled=”off” button_two_text_color__hover=”null” button_one_border_width__hover_enabled=”off” button_one_border_width__hover=”null” button_two_border_width__hover_enabled=”off” button_two_border_width__hover=”null” button_one_border_color__hover_enabled=”off” button_one_border_color__hover=”null” button_two_border_color__hover_enabled=”off” button_two_border_color__hover=”null” button_one_border_radius__hover_enabled=”off” button_one_border_radius__hover=”null” button_two_border_radius__hover_enabled=”off” button_two_border_radius__hover=”null” button_one_letter_spacing__hover_enabled=”on” button_one_letter_spacing__hover=”0″ button_two_letter_spacing__hover_enabled=”on” button_two_letter_spacing__hover=”0″ button_one_bg_color__hover_enabled=”off” button_one_bg_color__hover=”null” button_two_bg_color__hover_enabled=”off” button_two_bg_color__hover=”null” /][/et_pb_section][et_pb_section bb_built=”1″ fullwidth=”off” specialty=”off” transparent_background=”off” background_color=”#191919″ allow_player_pause=”off” inner_shadow=”off” parallax=”off” parallax_method=”off” padding_mobile=”off” make_fullwidth=”off” use_custom_width=”off” width_unit=”on” make_equal=”off” use_custom_gutter=”off” custom_padding_tablet=”50px|0|50px|0″ custom_padding_last_edited=”on|desktop” prev_background_color=”#ffffff” next_background_color=”#ffffff”][et_pb_row background_position=”top_left” background_repeat=”repeat” background_size=”initial”][et_pb_column type=”4_4″][et_pb_divider color=”#ffffff” show_divider=”off” divider_style=”solid” divider_position=”top” hide_on_mobile=”on” disabled_on=”on|on|off” /][/et_pb_column][/et_pb_row][/et_pb_section][et_pb_section bb_built=”1″ fullwidth=”off” specialty=”off” prev_background_color=”#191919″ next_background_color=”#1e83ec”][et_pb_row background_position=”top_left” background_repeat=”repeat” background_size=”initial”][et_pb_column type=”1_2″][et_pb_toggle admin_label=”Tool Bar (Workout)” title=”Tool Bar (Workout)” title_font=”|on|||” title_font_size=”24″ use_border_color=”off” closed_toggle_background_color=”#ffffff” custom_css_toggle_icon=”font-size: 24px;” title_font_size_tablet=”20″ title_font_size_phone=”16″ title_font_size_last_edited=”on|phone” saved_tabs=”all” background_position=”top_left” background_repeat=”repeat” background_size=”initial” _builder_version=”3.16″]
![]()
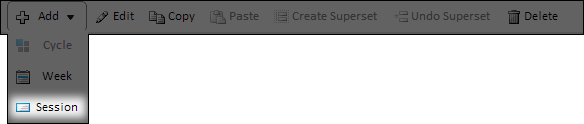
Add
Click to add a Cycle, Week or Session.
Edit
Click to edit a selected Workout, Cycle, Week, or Session.
Copy
Click to copy a selected Workout, Cycle, Week, Session or Exercise.
Paste
Click to paste a copied Workout, Cycle, Week, Session or Exercise.
Create Superset
Click to combine selected separate exercises into a single exercise.
Undo Superset
Click to separate exercises that are part of a superset.
Delete
Click to delete a selected Workout, Cycle, Week, Session or Exercise.
[/et_pb_toggle][et_pb_toggle admin_label=”Seasons” title=”Seasons” title_font=”|on|||” title_font_size=”24″ use_border_color=”off” closed_toggle_background_color=”#ffffff” custom_css_toggle_icon=”font-size: 24px;” title_font_size_tablet=”20″ title_font_size_phone=”16″ title_font_size_last_edited=”on|phone” saved_tabs=”all” background_position=”top_left” background_repeat=”repeat” background_size=”initial” _builder_version=”3.16″]
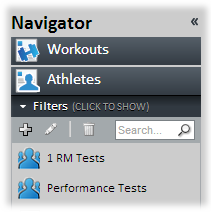
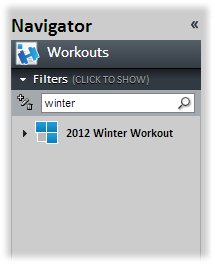
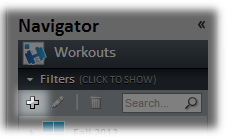
Searching Season Workouts
- Expand the Workouts section in the Navigator.
- Enter the search criteria in the Search box. Results are automatically filtered.
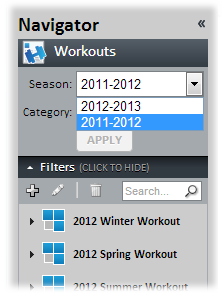
Filtering Seasons
- Expand the Workouts section in the Navigator.
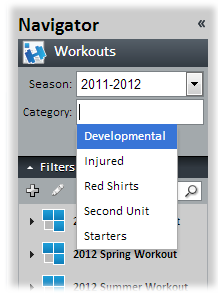
- Click Filters to show the Season and Category filters. expand the Select the Season, specify the appropriate Categories, and click APPLY.
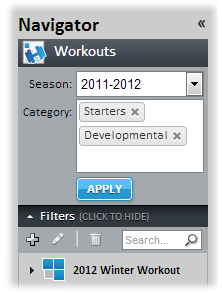
- Select the Season, specify the appropriate Categories, and click APPLY.
- Any Workouts matching the specified criteria are displayed.
[/et_pb_toggle][/et_pb_column][et_pb_column type=”1_2″][et_pb_toggle admin_label=”Tool Bar (Strength Cards)” title=”Tool Bar (Strength Cards)” title_font=”|on|||” title_font_size=”24″ use_border_color=”off” closed_toggle_background_color=”#ffffff” custom_css_toggle_icon=”font-size: 24px;” title_font_size_tablet=”20″ title_font_size_phone=”16″ title_font_size_last_edited=”on|phone” saved_tabs=”all” background_position=”top_left” background_repeat=”repeat” background_size=”initial” _builder_version=”3.16″]
![]()
Update Strength Cards
Click to update strength cards to include the latest changes made to Workouts.
Click to print strength cards.
Assign Athlete
Click to assign Athletes to the Workout. After Athletes are assigned to a Workout, strength cards can be printed.
Delete
Click to delete strength cards for selected Athletes.
[/et_pb_toggle][et_pb_toggle admin_label=”Workouts” title=”Workouts” title_font=”|on|||” title_font_size=”24″ use_border_color=”off” closed_toggle_background_color=”#ffffff” custom_css_toggle_icon=”font-size: 24px;” title_font_size_tablet=”20″ title_font_size_phone=”16″ title_font_size_last_edited=”on|phone” saved_tabs=”all” background_position=”top_left” background_repeat=”repeat” background_size=”initial” _builder_version=”3.16″]
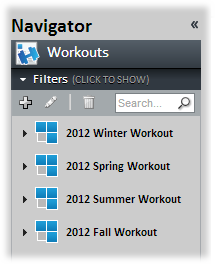
Workouts are established under Seasons in the Navigator and are comprised of Cycles, Weeks, and Sessions.
Create Workout
1. Using the Navigator, expand Workouts and click.
2. The Create Workout box is displayed. Specify the appropriate values and click CREATE.
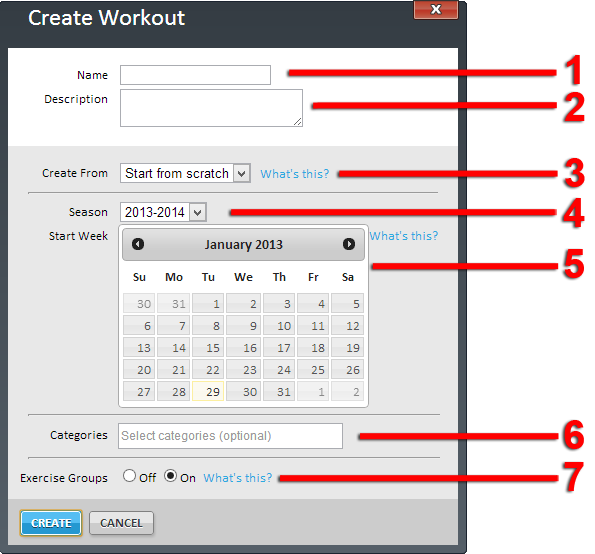
- Name – The name of the Workout.
- Description – A description of the Workout.
- Create From – Select whether this Workout should be created from scratch or based on an existing Workout. Selecting an existing Workout duplicates the complete structure of the Workout but uses the Season and Start Week specified in this box.
- Season – Select the season for which this Workout should be created.
- Start Week – Select the day on which the Workout should begin.
- Categories – Select the categories for which the Workout is being created.
- Exercise Groups – Select whether the Workout will use Exercise Groups.
3. The new Workout is displayed.
Edit Workout
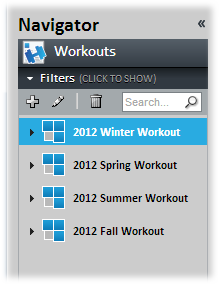
1. Using the Navigator, expand the appropriate Season. Select the Workout to edit in the Navigator or in the Workout Designer.

2. Click the edit pencil on the Tool Bar.
3. The Edit Workout box is displayed. Make the necessary changes and click UPDATE.

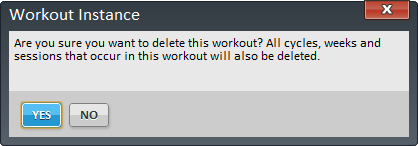
Delete Workout
1. Using the Navigator, expand the appropriate Season. Select the Workout to delete in the Navigator or in the Workout Designer.
2. Click Delete on the Tool Bar.
3. The Workout Instance box is displayed. Click YES.
Note: Any changes made are saved automatically. The status of saved changes is displayed below the Tool Bar.
[/et_pb_toggle][/et_pb_column][/et_pb_row][et_pb_row make_fullwidth=”off” use_custom_width=”off” width_unit=”on” use_custom_gutter=”off” padding_mobile=”off” allow_player_pause=”off” parallax=”off” parallax_method=”off” make_equal=”off” parallax_1=”off” parallax_method_1=”off” column_padding_mobile=”on” module_class=”anthemToggle” background_position=”top_left” background_repeat=”repeat” background_size=”initial”][et_pb_column type=”4_4″][et_pb_toggle admin_label=”Cycles” title=”Cycles” title_font=”|on|||” title_font_size=”24″ use_border_color=”off” closed_toggle_background_color=”#ffffff” custom_css_toggle_icon=”font-size: 24px;” title_font_size_tablet=”20″ title_font_size_phone=”16″ title_font_size_last_edited=”off|desktop” module_class=”anthemToggleBlue” saved_tabs=”all” background_position=”top_left” background_repeat=”repeat” background_size=”initial” _builder_version=”3.16″]
Create a Cycle
1. Select the Cycle under which the new Cycle should be created.
2. Click Add and Cycle from the Tool Bar.
3. The Add Cycle box is displayed. A Description can be optionally entered. Click SAVE.
4. The new Cycle is displayed.
Note: Any changes made are saved automatically. The status of saved changes is displayed below the Tool Bar.
Edit Cycle
1. Using the Navigator, expand the appropriate Season. Select the Cycle to edit in the Navigator or in the Workout Designer.
2. Click Edit on the Tool Bar.
3. The Edit Cycle box is displayed. A Description can be optionally entered. Click SAVE.
Note: Any changes made are saved automatically. The status of saved changes is displayed below the Tool Bar.
Duplicate Cycles
1. Select the Cycle to duplicate.
2. Click Copy on the Tool Bar.
3. Select the Cycle after which the copied Cycle should be placed.
4. Click Paste on the Tool Bar.
5. The copied Cycle is displayed.
Delete Cycle
1. Using the Navigator, expand the appropriate Season. Select the Cycle to delete in the Navigator or in the Workout Designer.
2. Click Delete on the Tool Bar.
3. The Cycle box is displayed. Click YES. All weeks and sessions that are included in the Cycle will also be deleted.
[/et_pb_toggle][et_pb_toggle admin_label=”Weeks” title=”Weeks” title_font=”|on|||” title_font_size=”24″ use_border_color=”off” closed_toggle_background_color=”#ffffff” custom_css_toggle_icon=”font-size: 24px;” title_font_size_tablet=”20″ title_font_size_phone=”16″ title_font_size_last_edited=”off|desktop” module_class=”anthemToggleBlue” saved_tabs=”all” background_position=”top_left” background_repeat=”repeat” background_size=”initial” _builder_version=”3.16″]
Weeks are established under Cycles in the Workout Designer.
Create Week
1. Expand the appropriate Cycle and Week for which the new Week should be created and click Add a Week.
2. The Add Week box is displayed. A Description can be optionally entered. Click SAVE.
3. The new Week is displayed.
Edit Week
1. Using the Navigator, expand the appropriate Season and Cycle. Select the Week to edit in the Navigator or in the Workout Designer.
2. Click Edit on the Tool Bar.
3. The Edit Week box is displayed. A Description can be optionally entered. Click SAVE.
Duplicate Week
1. Select the Week to duplicate.
![]()
2. Click Copy on the Tool Bar.
3. Select the Week after which the copied Week should be placed.
4. Click Paste on the Tool Bar.
5. The copied Week is displayed.
Delete Week
1. Using the Navigator, expand the appropriate Season and Cycle. Select the Week to delete in the Navigator or in the Workout Designer.
2. Click Delete on the Tool Bar.
3. The Week box is displayed. Click YES. All sessions that are included in the Week will also be deleted.

[/et_pb_toggle][et_pb_toggle admin_label=”Sessions” title=”Sessions” title_font=”|on|||” title_font_size=”24″ use_border_color=”off” closed_toggle_background_color=”#ffffff” custom_css_toggle_icon=”font-size: 24px;” title_font_size_tablet=”20″ title_font_size_phone=”16″ title_font_size_last_edited=”off|desktop” module_class=”anthemToggleBlue” saved_tabs=”all” background_position=”top_left” background_repeat=”repeat” background_size=”initial” _builder_version=”3.16″]
Sessions, also known as Workouts, are established under Weeks in the Workout Designer.
Create Initial Session
1. Expand the appropriate Week under which the Session should be created and click Add a Workout Session.
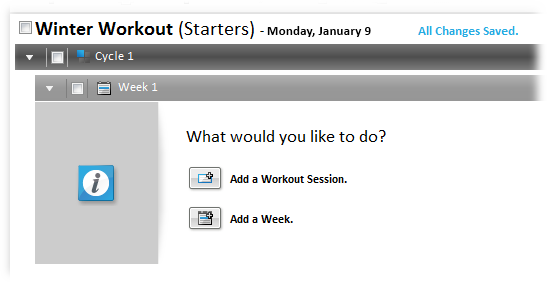
2. The Add Session box is displayed. Select the day the Session is to begin and click SAVE.
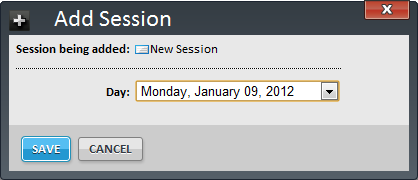
3. The new Session is displayed under the selected Week. You can now begin adding Exercises to the Session.
Create Additional Session
1. Select the appropriate week under which the Session should be created.
![]()
2. Click Add and Session from the Tool Bar.
3. The Add Session box is displayed. Select the day the Session is to begin and click SAVE.
4. The new Session is displayed under the selected Week. You can now begin adding Exercises to the Session.
Edit Session
1. Locate and expand the Session to edit.
2. Make the appropriate changes.
More information about the Session editor
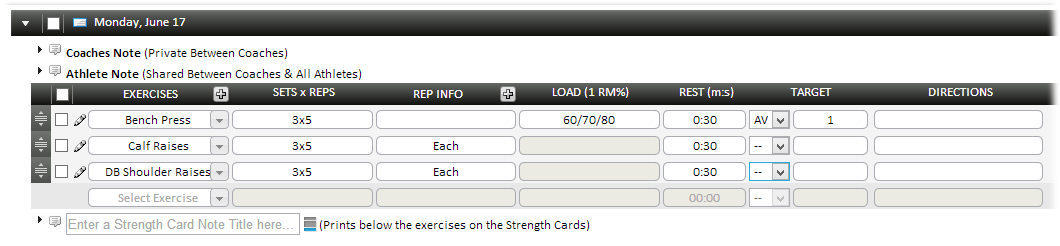
The following can be entered as part of a workout Session:
EXERCISES The list of available Exercises established on the Exercises page. New Exercises can also be added by clicking the Session editor header.
SETS+REPS Sets and reps for the Exercise.
REP INFO Provides units of measure for non-weight-related Exercises or other Exercise-specific information. Rep Info can be entered by typing the appropriate value, which will automatically display matching results in a drop-down, or by pressing the DOWN ARROW key to display all possible values in a drop-down. Rep Info values are established on the Rep Info page. New Rep Info can also be added by clicking the Session editor header.
LOAD (1 RM%) The percentage of the athlete’s 1 RM for weight-related Exercises.
REST (min:sec) The amount of time the athlete must rest between sets.
TARGET The target of either velocity or power that Athletes should achieve when performing Exercises that can be tracked by PowerTracker. If “Average Velocity” or “Peak Velocity” is selected, the value used is meters per second. If “Average Power” or “Peak Power” is selected, the value used is a percentage of watts in relation to other reps performed for that Exercise for the current day.
An Average Velocity Target set at 1 meter/second.
A Peak Power Target set at 60% of wattage for all the reps performed that day.
DIRECTIONS Any special instructions relating to the Exercise.
To change the order of Exercises, click the “grabber bar” and drag an Exercise to the appropriate location.
More information about the Advanced Set Editor
The Advanced Set Editor provides the ability to specify more specific details for each Exercise. Click to open the Advanced Set Editor.
REPS The number of reps for the Exercise set.
REP INFO Provides units of measure for non-weight-related Exercises or other Exercise-specific information.
LOAD (1 RM%) The percentage of the athlete’s 1 RM for weight-related Exercises.
OBSERVE SET Indicates the set must be observed by a trainer or strength coach.
Target Measurement The target of either velocity or power that Athletes should achieve when performing Exercises that can be tracked by PowerTracker.
Target Type Indicates whether the Target is either a specific amount of velocity or power (“Absolute Value”) or a percentage of velocity or power compared to other Reps performed during that Session (“Relative Percent”).
When the Target Type is “Absolute Value”, the Target is the velocity (in meters/second) or power (in watts). When the Target Type is “Relative Percent”, the Target is the percentage of power or velocity compared to other Reps performed during that Session.
After all changes are made in the Advanced Set Editor, click the SAVE button.
More information about grouping Exercises
Multiple Exercises can be grouped when they must be performed together. To group Exercises, select the Exercises that should be grouped together and click the Create Superset button.
Grouped Exercises are identified by extended “grabber bar” located to the left of the Exercises.
To separate Grouped Exercises, select one of the Exercises and click the Undo Superset button.
More information about deleting Exercises
Exercises can be deleted so they are no longer included in a Session. To delete an Exercise, select the Exercises that should be deleted.
Next, click the Delete button.
The Exercise box is displayed. Click YES.
More information about Notes
Three types of notes can be added to Exercises and printed on strength cards:
Coaches Note – A note that is only visible in the Workout Designer.
Athlete Note – A note that is printed on all strength cards.
Strength Card Note – A note that is printed at the bottom of strength cards.
[/et_pb_toggle][/et_pb_column][/et_pb_row][/et_pb_section][et_pb_section bb_built=”1″ fullwidth=”off” specialty=”off” transparent_background=”off” background_color=”#1e83ec” allow_player_pause=”off” inner_shadow=”off” parallax=”off” parallax_method=”off” padding_mobile=”on” make_fullwidth=”off” use_custom_width=”off” width_unit=”on” make_equal=”off” use_custom_gutter=”off” custom_padding=”20px||5px|” disabled_on=”off|off|off” disabled=”off” module_class=”anthemSlimOptin” custom_css_main_element=”background-image: -webkit-gradient(linear, left bottom, right top, from(#62d8e4), to(#26baf2));||background-image: -webkit-linear-gradient(left bottom, #62d8e4, #26baf2);||background-image: -moz-linear-gradient(left bottom, #62d8e4, #26baf2);||background-image: -o-linear-gradient(left bottom, #62d8e4, #26baf2);||background-image: -ms-linear-gradient(left bottom, #62d8e4, #26baf2);||background-image: linear-gradient(left bottom, #62d8e4, #26baf2);||filter: progid:DXImageTransform.Microsoft.gradient(GradientType=1,StartColorStr=’#62d8e4′, EndColorStr=’#26baf2′);||” prev_background_color=”#ffffff” custom_padding_tablet=”20px||5px|” global_module=”204171″][et_pb_row global_parent=”204171″ make_fullwidth=”off” use_custom_width=”off” width_unit=”on” use_custom_gutter=”off” custom_padding=”0px||0px|” padding_mobile=”on” allow_player_pause=”off” parallax=”off” parallax_method=”off” make_equal=”off” parallax_1=”off” parallax_method_1=”off” column_padding_mobile=”on” parallax_2=”off” parallax_method_2=”off” background_position=”top_left” background_repeat=”repeat” background_size=”initial”][et_pb_column type=”1_2″][et_pb_text admin_label=”Title” global_parent=”204171″ background_layout=”dark” text_orientation=”left” use_border_color=”off” border_color=”#ffffff” border_style=”solid” text_font=”|||on|” text_font_size=”30″ custom_css_main_element=”font-weight: 900;” custom_margin=”||0px|” custom_padding=”||5px|” module_class=”anthemSlimOptinTitle” custom_padding_tablet=”||0px|” custom_padding_last_edited=”on|phone” custom_padding_phone=”||5px|” background_position=”top_left” background_repeat=”repeat” background_size=”initial”]
Want to know what’s new?
[/et_pb_text][et_pb_text global_parent=”204171″ background_layout=”dark” text_orientation=”left” use_border_color=”off” border_color=”#ffffff” border_style=”solid” custom_margin=”||0px|” custom_padding=”||0px|” custom_padding_tablet=”||10px|” custom_padding_last_edited=”on|tablet” text_line_height=”1.4em” background_position=”top_left” background_repeat=”repeat” background_size=”initial”]
Sign up and we’ll keep you up to date
[/et_pb_text][/et_pb_column][et_pb_column type=”1_2″][et_pb_contact_form admin_label=”Slim Opt-in 2 Fields” global_parent=”204171″ captcha=”off” use_redirect=”off” input_border_radius=”3″ use_border_color=”off” border_color=”#ffffff” border_style=”solid” custom_button=”on” button_use_icon=”off” button_icon_placement=”right” button_on_hover=”on” button_letter_spacing_hover=”4″ title_text_color=”#ffffff” button_text_color=”#ffffff” button_bg_color=”#50d18d” button_bg_color_hover=”#58e896″ button_letter_spacing_hover_last_edited=”on|phone” module_class=”anthemSlimOptinTwoFields” email=”info@eliteform.com” title=”Sign up for the newsletter” success_message=”Thanks for reaching out! We will keep you up to date on the latest info.” custom_message=”I want to sign up for the newsletter||et_pb_line_break_holder||%%Name%% %%Email%%” border_radii=”on|3px|3px|3px|3px”][et_pb_contact_field field_title=”Name” field_type=”input” field_id=”Name” required_mark=”on” fullwidth_field=”off” field_background_color=”#ffffff” input_border_radius=”0″ form_field_font_select=”default” form_field_font=”||||” use_border_color=”off” border_style=”solid”]
[/et_pb_contact_field][et_pb_contact_field field_title=”Email” field_type=”email” field_id=”Email” required_mark=”on” fullwidth_field=”off” field_background_color=”#ffffff” input_border_radius=”0″ form_field_font_select=”default” form_field_font=”||||” use_border_color=”off” border_style=”solid”]
[/et_pb_contact_field][/et_pb_contact_form][/et_pb_column][/et_pb_row][/et_pb_section]